Monday, March 16, 2020

Catching Up

March 16, 2020  The world is in a pandemic situation with a coronavirus outbreak. So today I am home with time to catch up on what has been going on in my quilting world since my last blog post. I apologize in advance for its length but hey it will give you something to do, and there are lots of pictures for you to enjoy.

Update on MOJO-of course it did return, as I expected it would. And in full force! Meanwhile I got to enjoy some reading and other activities, while letting my arm heal. It still gives me trouble but I'm learning to listen to it when its had enough.

I made a quilt for a friend to give a new nephew.
The quilt front
Jungle Safari was the requested theme

The quilt back
I fell in love with these animals, especially that giraffe!


Our family went on an day trip to a zoo to celebrate our granddaughters birthday.  
We took our daughter to Nashville, TN
  My husband and I went to Gatlinburg, TN. and I got to visit some quilt stores along the way.
Time well spent, precious memories made. 

In October of last year I upgraded my long arm. I was interested in trying some ruler quilting but the one I had was not stitch regulated, and the frame I had was not user friendly for quilting lots of quilts. For the occasional home quilter it was fine. But I do some quilting for friends, etc and I needed one that was easier to advance the quilts on, so I traded up. Good move.

I was busy all during fall with a couple of quilt retreats and getting my quilts ready for a guild quilt show.  I entered 12 items and I won ribbons on three of them! I have never won three ribbons in a single show before!!!! I've been a member of the guild since 1997 and I have entered a lot of shows. Some of the quilts I have blogged about in previous posts.


Pattern "Laundry Baskets" by Fig Tree Quilts made with fabrics out of my scrap basket.
Won honorable mention in its category.


Scrappy Baskets, fabrics made from my scrap basket.


"A Few of My Favorite Things" my own pattern, fabrics from my scrap basket.


Guild mystery quilt sew a long, fabrics are 30's reproductions from 1990's
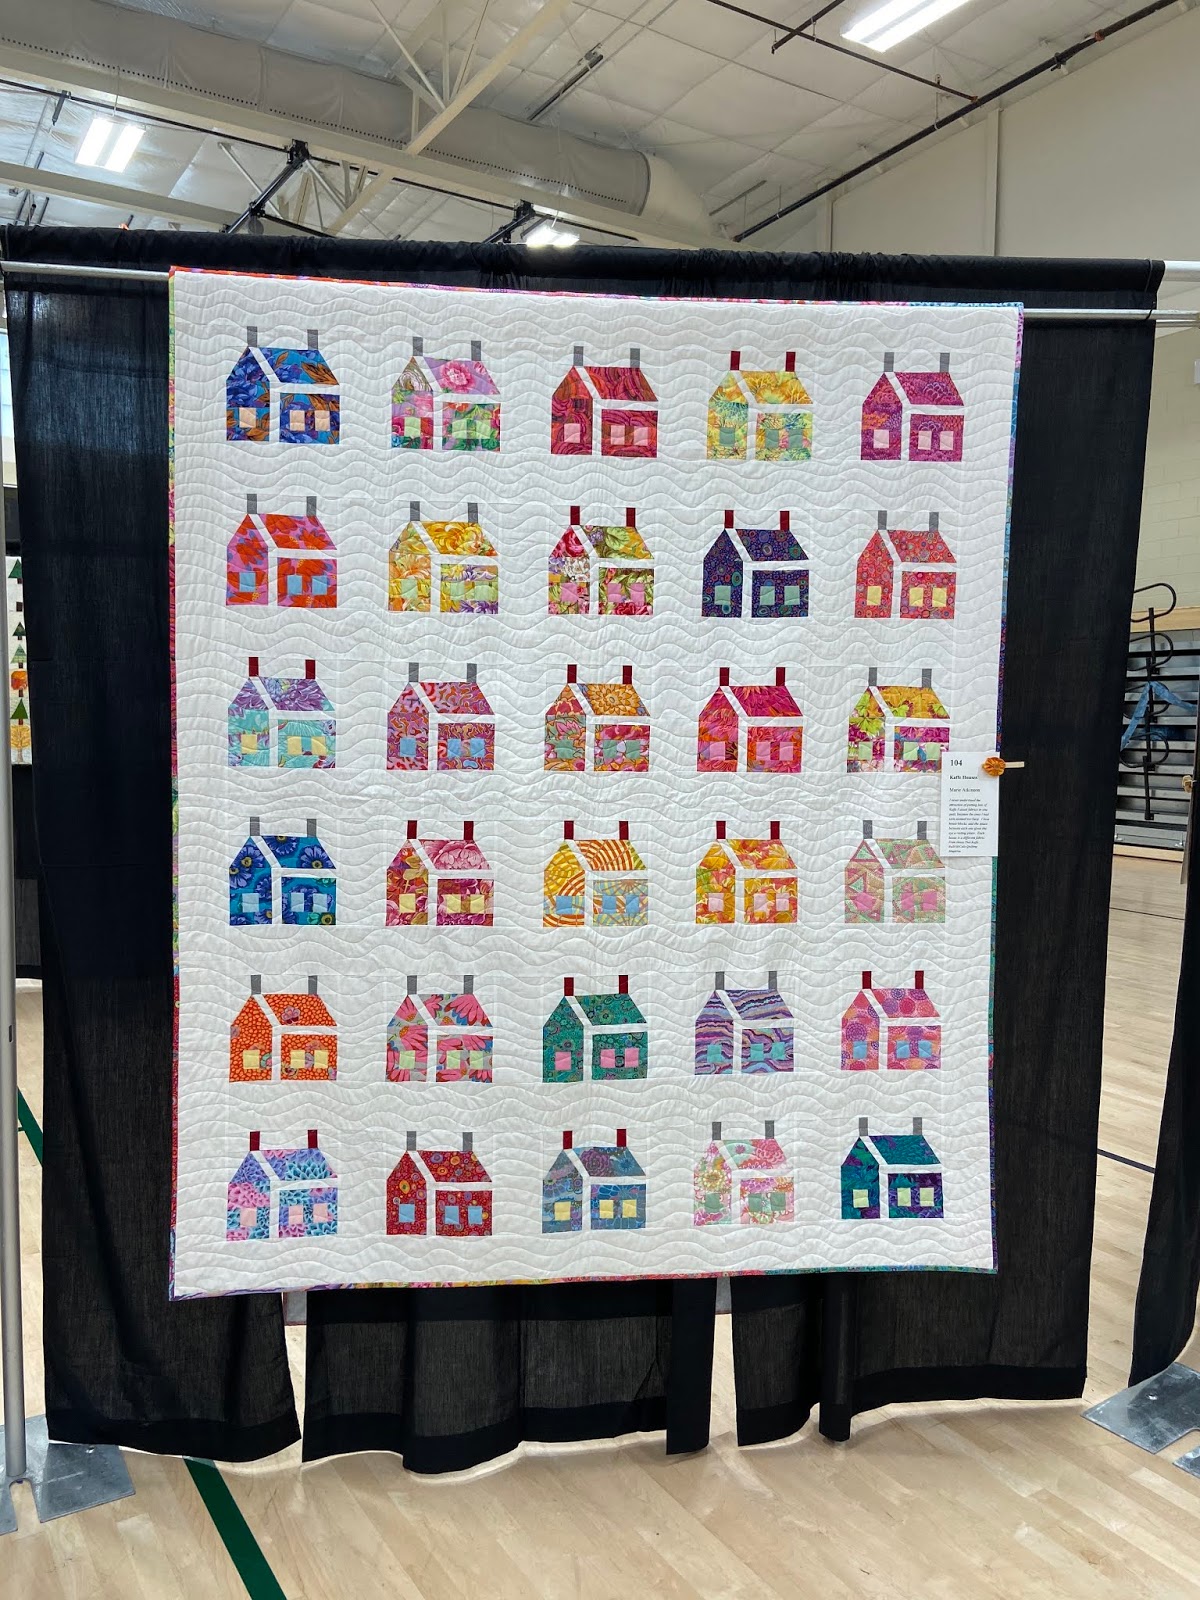

The House That Kaffe Built, Pattern from McCalls Magazine, all Kaffe Facett fabrics


Pattern found in a book by Fig Tree Quilts, fabrics from my scrap basket


My sweet family came to support me at the show.
The quilt on the left is Indigo Church Dash, blocks were my moms, I finished the quilt.
Quilt on the right was made with blocks made by a relative of my moms, finished by another guild member friend.


Quilt Show Challenge Quilt - Named River Weave, found the idea on line, 
Quilt had to have the dark blue fabric in the quilt touching both sides of the quilt.
Challenge was called "A Quilt Runs Thru It"
I enjoy going "modern" once in awhile


Posey Patch, Pattern in American Patchwork and Quilting Magazine, fabrics from my scrap basket.


Weaver Fever, Mom made the top, I finished the quilt.


Round and Round, Pattern by Thimbleblossoms, Solid fabrics are American Made Fabrics
Won 3rd place in its category
The name inspired the quilting of a spiral coming out from the center.


My Secret Garden, Pattern in the book "Gathered From The Garden" by Cindy Lammon
 fabrics from my scrap basket
Won 2nd place in its category

I also shared in winning a second place ribbon for this quilt.
My friend Elaine Turcotte made this quilt and I did the blanket stitching on the dogs, and quilted the quilt.  She had never entered a show before.  Its a fun quilt that makes the viewer smile!


I also made a fun quilt for a friend to give her granddaughter.

The child's name is Gemma, so she wanted it to have gems. The back is a fabric that had lots of gems on it.

2020 has already been full of fun Quilty things!

For the last couple of years my local quilt guild has had a mystery quilt sew day in March, to celebrate National Quilting Month. In January I quilted last years mystery while I tried my hand a quilting with "rulers". This method gives the longarm quilter the ability to make quilting lines more stable without the use of a computer. But it is really time consuming. The quilt has to be stabilized with some in the ditch quilting before using the rulers. Then the ruler work itself comes with its own learning curve. Here is a look at the quilt on my dining room table with the light from the French doors shining across it so you can see the quilting lines.

Then at the end of January I quilted a quilt I made at Hilton Head, SC in October while spending a week quilting with friends.


This is the front. It is a screen printed panel. I love the beach.


This is the back.


In mid January I attended my guild's annual winter retreat, and in February I got to go on a unexpected retreat to Quiltville Inn! When Bonnie announced that she was opening up a lottery for quilt retreats a lady in my guild signed up for a group of 12 of us from the guild.  I truly thought it would be a long shot for us to get a chance. But a few days later we had a date! Wow! So on the weekend of Valentines Day we headed off to Virginia!!!! Can I just say that it was the retreat that all other retreats are going to try to live up to! Not just because we got to spend some time with Bonnie, of course that was great!, but staying in the house was such a treat and spending time in a homey atmosphere with 11 of your quilty friends is just the best! Having a place to get away from the machine was an added treat.  I like sewing but I have to admit that after a few hours I need to get up and stretch, but more importantly I need a place to unwind that isn't just getting in the bed.  So every evening found me relaxing in the "Hen Den" in a nice easy chair. How thoughtful of Bonnie to include that amenity.  The beds were so comfortable, all cozy with her wonderful quilts and a bonus vintage quilt to keep away the chill. It was an unforgettable experience. Here we are making a memory of our time....


The projects I worked on


last day of retreat, hand binding until time to go


The Hen Den

There is a full walk through video of the inn on Youtube
Quiltville Inn Wilson VA
Thanksgiving 2019 post


Since then I have been enjoying my wonderful hobby again in full force.  I have put the binding on 2 quilts that I had quilted in the fall before the quilt show but didn't get a chance to finish.

Kith and Kin
Pattern and Fabric by LellaBoutique
Fabric Line-Farmers Daughter
Kith means Friends - Kin means Family
So Friends and Family
I LOVE this fabric.
This was a kit-I never buy kits.

The one I was binding at Quiltville Inn

Home Again
Pattern and Fabric by LellaBoutique
Fabric Line-Farmers Daughter
Did I mention I LOVE this fabric?
I love house quilts.
This was a kit.
Did I mention I never buy kits?

Though I'd rather make quilts from my own choice of fabrics the fabric in these two quilts just really called my name and I like the patterns so I bought these two kits.

I have heard it said that every quilt has a story. Admittedly some of them as the two above are just basic information kind of "stories". 


My most recently quilted quilt has a story.....

The story of a quilt that took 18 years!!!!!
Now thats a story!

This story is not a political statement kind of story.
It's not a live changing "moral of the story" kind of story.
And when you look at it you wouldn't guess that there is a story.
As a matter of fact you may even get bored with the story.
You may even think when you look at it that it doesn't deserve a story.

Here is the quilt.....
A grandmothers flower garden, made with a floral fabric, a striped fabric and 2 solid color fabrics.


And here is the story......

As a young mom money was slim. I purchased an inexpensive floral comforter for the bed in our master bedroom.  I wanted pink and white stripe fabric for the curtains. I went to the store and they had exactly what I was looking for, so I purchased enough to make curtains for the room. The cost of the fabric was really more than I had ever spent on curtains for a room in our home before; but it was what I really wanted.  A couple years later we moved to another house, so I refashioned the curtains to fit the new windows. 

 A couple years later I got pregnant with our daughter.  I went to the store and found another floral fabric that I really liked for her nursery.  I went to two stores to get enough fabric-the room had 7 windows! The fabric at one store was drapery weight and at the other store was regular polished cotton, both in the same pattern.   I decided that I would take the stripe curtains from our room and use it as accents with the polished cotton and made the curtains, crib quilt, dust ruffle, etc for the nursery, and use the drapery weight as a shower curtain.  The room was delightful! Then she grew up and decided that pink floral was not for her when we moved her into a big girl bed, so everything got changed but I don't remember what we used next, haha. She is now 22 years old. I've slept a time or two since then. 

I joined a quilt guild the year she was born and was learning a lot. I came across a picture of a grandmothers flower garden hexagon quilt in a magazine that had striped fabric in one of the rings of the pattern.  I decided that I would use the fabrics from my daughters nursery as the fabric to recreate the quilt. So I began disassembling all the items I had made.  Repurpose-reuse-recycle.  I had seen English paper piecing demonstrated but didn't really like it, so I decided to traditionally piece the hexagons, tracing a sewing line on the back of the fabric after cutting the pieces out with a hexagon template and a rotary cutter. Without a pattern to go by I began to make flower units not knowing how many I would be able to make.

About that time I worked for a short time for Hancock Fabrics and came across a pink solid fabric that was the same hue as the pink in the striped fabric, so I bought some yardage of it to use as the connecting "path" for the floral and striped rings.  Not knowing how much to buy, I decided I would make the quilt as big as I could make it with what I had. Around the same time I found a white fabric with tiny pink flowers that I thought would be a perfect back so I bought some of it hoping it would be enough. Also there was a closeout sale on some premade quilt binding in the exact shade as the pink solid fabric so I bought the last four packs hoping it would be enough for the quilt. This was sometime around 2001-2002??

 I started taking my "little" hand sewing project to guild meetings, and visits with my friends, etc.  It soon outgrew a little zippered bag I carried it in, so I bought a cardboard "suitcase" that had a pink floral design on it to carry all the supplies I needed.  I would spend some time cutting pieces and marking the sewing lines at home and then I'd have them ready for sewing when I needed them. My best friend marveled that I would attempt such an undertaking, and said "you will never finish that thing".  I said that was ok I was enjoying the journey. And I did, for over 15 years!

 Finally I made it as big as I could as I ran out of the pink solid.  I decided that I would cut the sides straight so I could add a borders. I wanted to do a border of the stripe fabric, because I had a lot of it left! I really got our money's worth out of that striped fabric!  I needed something to stop the design of the hexagons before adding the striped border.  What to do? What color would be right? After some searching my daughter helped me decide on a green small inner border. She is a wonderful artist and is good with colors. Done. That was easy enough. Now time to put the stripes on. How to do the borders....Corner stones or mitered corners? I knew how to do mitered borders but could I make that stripe look right? Spent time at a retreat putting the borders on with mitered corners and they looked fabulous!!!! 

Now we are at around 17 years?  The finish line is in sight!!!!! I put it on the long arm in August of 2019. Sent my friend a picture...."You thought it would never get done!" (this would be where the background music lets you know to pay attention, LOL)
Half way through quilting, the borders started ruffling!!!!! HOW??WHY??  I have made and quilted hundreds of quilts by this time! How is this possible???? 
I don't have time for this!!!!!! The quilt show is in November, I have to turn in the submission form in September! No way I could do that until I was sure it was going to look good.
So I took it off the frame and began to unquilt the last row I quilted thinking I must have done something wrong while I was advancing the quilt or something.
Unquilted two passes just to be sure and put it back on the frame. NOPE! It is still not laying flat!
Take it back off the frame and fold it up deciding with great disappointment that this is not the year its going to get done. (sad face)
Spent several weeks taking the quilting out in my spare time.
Finally get the quilting all removed, folded it up and put it in time out. 
February 2020-OK lets get this thing done!
Take the borders off and reattach, yep they were too long.
Load on the long arm frame, thinking all is well, it should do ok.
18" from the bottom the border starts to ruffle again!!!!!! OH NO!!!!!!
I told my husband I was OVER this quilt!!!!! 
Of course he said, "you can't be, you've got 30 years invested"!
Take off the bottom border, quilt the rest of the middle of the quilt.
Take it off the frame reattach the border as best I can and fix the side borders so they lay flat.
Finished quilting it on my regular sewing machine.
FINALLY! Its done! February 21, 2020!
Trimmed the edges for binding. 
Better done than perfect is all I can say.
Got out the packaged binding that I had purchased so many years ago.
Opened and pressed the binding in half and attach it like regular binding is attached, and I had enough! whew!
Soon the binding will be finished and I will be able to call this quilt done.
How's that for a story?

So if you stayed with me until now, let me just say that I don't know why I had so much trouble with the borders of this quilt. As I said, I have made and quilted a lot of quilts with no such issues. Back when I started the piecing of this quilt I was a relatively new quilter and I didn't know not to use polyester/cotton fabric. Turns out the pink and white stripe fabric had polyester in it.  Polyester in a fabric behaves differently than cotton. So maybe that's what happened? Who knows. All I know is that at the end of the day, I did enjoy the journey of making this quilt, and I am happy enough with the finished project. 

As quilters our quilts aren't always "perfect", and some of them teach us valuable lessons. Is that story "exciting", no, but this quilt is a lifetime project and will always have a special place in my heart. When I took it to our monthly guild meeting this month many of my long time guild friends remembered me sewing on those hexagons all those years, and my little rose covered box. This quilt has seen a lot of good days and I hope that it sees a lot more in the days to come.

Bonus: Fun facts
1. The fabric peaking out at the bottom right corner of the picture of the quilt is the drapery weight version of the floral fabric that now covers my ironing board. 
 2. I cross stitched a pink and white striped bow that I hoped would one day hang in the room where the quilt would reside, it is currently hanging the in the master bedroom. 


So thats what has been happening to me since my last post.

I pray the pandemic will soon be over and all will return to "normal" soon.
I wonder if there will be quilts made that tell this story?

Until then, don't panic, sew something, spend time with your loved ones, read a book, clean a closet. And for goodness sake leave some toilet paper for other people when you shop!

Hopefully my next post won't be so long. Thanks for hanging in there if you made it this far.

HAPPY QUILTING!


Friday, July 5, 2019

Missing MOJO

Well here it is July! So what have I been doing since my last post?

After being so busy over the last year making lots of quilts, around the first of April I developed tendonitis in my upper right arm. Man! That will put a cramp (pun intended) in your style! It has been  painful but more of a aggravation than anything.

I went to see an exercise physiologist about it and she felt that 4 visits with her would have me right as rain, along with some exercises to stretch the tendon. After the 2nd visit, around the first of May, I went to a weekend quilt retreat, where I spent one whole day cutting out pieces for a new quilt.

When I returned to see her the next week, she could tell I had been doing something because the tendon was very tight.  When she asked what I had been doing, I told her "rotary cutting". She said I had to lay off that for a while.  Enter sad face! I looked up tendonitis on the internet and found that the healing process could take 2-4 months.  Well pooh! What happens when a quilter can't quilt? Loss of MOJO!

Every creative person experiences a loss of creative flow once in a while.  Along with the tendonitis, I also realized that in spite of making so many wonderful quilts I had made no noticeable dent in my fabric stash. This was discouraging to me.  Now to some quilters that is not a source of discouragement. To me it means that no matter how many quilts I can possibly make my children will have too much to dispose of upon my demise. Again to many quilters this is just one of the facts of life.  But I also had to face the fact that I have a lot of quilts.  And for me having a lot of quilts made me realize that I just don't need to make lots and lots more quilts that don't have a purpose. So I purged a bunch of fabrics that were not bringing me joy and made room for some of my quilts so I could enjoy the fruit of my labor instead of stuffing them in the closet.  The first picture is of my fabric collection a year ago. The second is after making several quilts and purging fabric to make room for some finished quilts.


I still have plenty of fabric for many future quilts and I'm sure my mojo will return soon.

 Meanwhile I am reading "real" books, looking at inspiration thru Instagram and Pinterest.

I have a spot that I display quilts and I usually only change them out with the seasons, leaving a whole lot of quilts hanging in the closet, not being enjoyed.  So I have decided that when you don't want to sew, you can just play with what you've already made.


This quilt was an online mystery quilt. I named it Dance of the Dragonflies because there are dragonflies in the border fabric.

You can find this pattern on thisandthatpatterns.typepad.com by Sherri Falls
It is a free pattern on the right side called Mystery Monday's #3

So if your mojo has disappeared, fear not, just enjoy the world you are in as best you can and one day it will show back up and you will be better for the rest. 


Thursday, March 14, 2019

Scrappy Cake Stands

Every once in awhile a quilt pattern will show up that just says "make me now"! Recently a friend was cleaning out her quilt books and gave me a stack. In that stack was an old book on scrap quilts.


As I have mentioned before I had a hard time wrapping my head around making scrap quilts. So I wasn't immediately drawn to this book.  I sort of just flipped through it and set it aside. A couple of weeks later I was preparing the stack to go to a lady who is collecting books for my guilds show in the fall. We are having a used book sale at the show.  So I just flipped through it again and came across this quilt.


Soft colors and florals are my favorite.  So if this quilt had been made with dark prints I probably wouldn't have given it a second glance. But it caught my eye.  The pattern was referenced in the back of the book.  So I flipped to the pattern.


This is it. Just a grid. Well no problem. I've made lots of blocks, I got this.

So I dumped my scrap basket out on my dining table and began making "pairs" of fabrics for the cake stand and the background.

My local quilt guild has a retreat in January. So I "kitted" up the pairs I had made. Made a sample block to be sure I had the sizes and amount of pieces needed to make each block so I could be sure I had enough of each fabric.  Placed them in a box and headed to retreat.  I worked almost the whole retreat on the squares needed for this quilt.  As I made each block I declared it my favorite, until I made the next one. 

By the end of retreat I had all the blocks made.  When I got home I was so excited to see this quilt come together I immediately cut the setting triangles.


Then I got in my stash and found a border and backing fabric. Sewed the border on, loaded it on my long arm, and quilted it. 


I am so pleased! It is now among my favorite quilts.  

While hand sewing the binding down I spilled a glass of iced tea on it. So as soon as the binding was done I tossed it in the wash. It is just lovely and crinkly and cuddly! 

For the backing I had 2 yards each of 2 pieces of cream print fabric. 
I pieced together scraps of batting to make a piece big enough.


So everything came from my stash!

This is what quilting for the sheer fun of it looks like!

What I have really learned over the last year about quilting is USE YOUR FABRIC!
Use the stuff you have been saving. Get rid of fabric that you don't love. And have fun!
If you don't use it your heirs will give it away so don't save it!

Theres another pattern in the book that looks equally fun, 
so who knows, 
maybe another scrappy quilt lies ahead. 

Have Fun Quilting Today!


Tuesday, February 26, 2019

Mama's Bow Ties

One of the quilts I finished in 2018 was a quilt my mom started.  This is me and my mom.


We enjoyed many hours of quilting together.  We took classes and went on quilt retreats. We enjoyed going to quilt shows together. 

As her health started to fail I asked her if there was one quilt that she really wanted to finish what would it be.  It was a bowtie quilt made with feed sack fabrics.

She would come to my house and work on it and we would sew together as best she could.  She finished piecing all the blocks.

She passed away in November of 2016

We belonged to a local quilt guild and every January we would go to our guilds annual retreat.

So I took those blocks to the retreat in January 2017 and put the top together. It made me feel like she had attended the retreat with me.


After the retreat I went home and got the remaining feed sacks out that she had not cut yet and there was one print that there were 2 of. Her favorite color was purple. So I used them for the border. And picked a purple out of the stash for the binding.


Im so glad to have finished this quilt in my mom's honor.  I will feel her presence with me when ever I hold this quilt.

After she passed I was blessed to clean out her sewing room and I added some of her fabrics to my stash, and I picked some of her favorite UFO's to finish, so there will be more of her quilts to share in the future.

In memory of Shelvy Miller 1939-2016

Wednesday, February 13, 2019

Quilting Fun

There is a "fad" right now of making quilts from 2 1/2" strips called a "Jelly Roll Race". I think it has other names as well.  You take the strips and sew them end to end and then you bring the two ends together and sew them side by side, and keep doing that until you get a lap size quilt. Well I have  containers of left over strips and squares and my bin of 2 1/2" strips was full. So I took them and made this quilt. The back was made of large pieces of fabric from my stash.        


Scrappy Irish chain made from the squares in my 2" bin. The back is again large pieces of fabric from my stash.


The next quilt is made from a collection of 30's reproduction fabrics that my mom had collected. I used plain muslin on the back.


This quilt is made from fabrics that I purchased or collected because they are soft pastel and floral. I had seen a quilt made in a similar pattern years ago and this was a "bucket list" quilt for me. I absolutely love it, and friends have said this is definitely a "Marie" quilt. The only problem with this quilt is that I made it a little too big for evenings in the recliner. But I do love it.


Since I have purchased a long arm machine quilting goes much faster and is way more fun!

Thank you for reading this and I hope you have a wonderful day!


Sunday, February 3, 2019

Thank you! Welcome Back

Thank you to all of you who connected here from my facebook page. I have received some nice compliments about my last post. Thank you all for reading.


Today’s quilt is a quilt I also started in 2016. It’s made from a commercial pattern called ‘Laundry Baskets’ by Fig Tree Quilts. Another “scrap quilt” made with left over pieces of other quilts.

One of the struggles I had as a beginning quilter in using lots of different fabrics in a quilt, was the fear of getting a piece of fabric too close to another piece of the same fabric. I’m not sure why that is a struggle but I have talked to others who have had the same struggle. I have worked really hard on a couple of quilts to try and make sure that doesn’t happen and guess what when you close your eyes they migrate near each other and you don’t catch it until it’s quilted! Oh no! Then you laugh at yourself and realize the world didn’t come to an end and the quilt police never showed up! And actually the unplanned randomness of just picking up a piece of fabric and sewing is really liberating. The more I do it the more fun I have and actually isn’t that what this hobby is really supposed to be anyway? I am totally in love with the happy colors of this quilt.

But here comes the ugly truth of why this quilt took two years to complete - I was afraid to quilt it.  There I said it. If you quilt at all you are probably familiar with the anxiety that comes with deciding how a quilt is going to be quilted. But add to that the years of belonging to a guild and going to quilt shows and seeing all the wonderful quilts that are out there and paralysis  can quickly occur. So it sat. As I mentioned in the last post I purchased a long arm quilt machine & frame allowing me to get quilts finished more efficiently. So after considering a couple of other quilts I had finished I decided to do a simple meander and it is (in my opinion) wonderful! And better yet it is done! I’m not sure who to credit with this quote but ‘better done than perfect’ has become a favorite phrase. But I can’t honestly say that it would have made the quilt a better quilt if it had been quilted any other way. Here is a picture of it before it was quilted.


And a close up of the quilting and backing fabric. 


Now I’m not sure if you can tell but the binding matches the border on the front and the backing on the back. The casual observer wouldn’t notice that. I love solving quilting challenges and when I realized that I didn’t have enough of the border fabric to make the binding, I had a decision to make. I didn’t really want to add the backing fabric to the color story on the front. Then I remembered I had a similar challenge a couple of years ago when someone asked me to make them a quilt. There was an article in a quilt magazine about doing a two sided binding. So I dug out the article I had saved and problem solved. Here are pictures from the quilt I made for the customer.


I will be presenting this technique at my local guild in April as a program for our monthly meeting.
It is nice to have tools in your tool belt to accomplish wonderful things. 

I have noticed that my picture taking abilities need improving. I wish you could see this in person. 

Quilt making is fun!

 Tomorrow is the start of a new week. My favorite day of the week is Monday.
I know that is crazy. But I feel that Monday brings order after the weekend. I hope you all have a great day. My words of wisdom to my children when they were becoming teenagers and dealing with the choices of life is "You are the only thing holding you back". So this week don't let anything hold you back from being the best you that you can be. 


Saturday, February 2, 2019

Welcome 2019!


To say that 2018 was a good year for me would be an understatement!

As you can see it has been awhile since I posted here in blogland. A lot of life has happened since I last posted. Not all of life is good, as I’m sure everyone can attest. There have been ups and there have been downs. But God is faithful and I am glad that I can agree with the writer of Psalm 73:28, “But as for me, it is good for me to draw near to God; I have made the Lord God my refuge and placed my trust in Him, that I may tell of all Your works.”  So back to the opening statement of this post.

2018 brought a wonderful change to my home. My quilting studio was upstairs in my home, making it less than easily accessible during a normal day. I would try to get all my daily chores done before climbing the stairs, only to finally get there and someone ring the doorbell, or call asking for something that was downstairs. I am 58 years old and in 2017 I injured my knee so there are days when climbing the stairs is just not all that easy.

We had a single car garage attached to our home that we used mostly for storage. The entrance to our laundry room was also located in the garage. The garage floor was a step down from the house floor. So envision a trip to the laundry room (the floor of which was level with the house floor) - step down, walk to entrance, step up, do laundry, step down, walk to house entrance, step up. Not a good thing.

So in 2018 we made a decision to renovate. We closed in the garage, raised the floor level with the house, and made it my quilt studio! Oh happy day! Not only was my studio now easily accessible but trips to the laundry room are no longer a workout. And I purchased a used low end small “longarm”. By small I mean the distance between the needle and the back of the machine is 14”, where most are 18” or more. These changes have been a game changer in my world!

So not to make this blog a boring journal of words I would like to begin today posting pictures of quilts that I have made over the last year. There will be a little story of each quilt, because every quilt has a story, even if it isn’t a earth shattering one. And along the way I’ll write a little of my story. I may not have a huge blog following but somehow this little record of my quilts may be a record of me, my likes, and my quilt making journey.

The quilts will not be shared in any particular order, just that they were finished in 2018. One note - the pictures were taken on my phone and not in stunning settings. The first one was taken at a quilt retreat where I had just finished sewing the binding on.


This quilt was started in 2016. The main fabric was purchased a "few" years ago with no real idea of what it was going to be used for.  5 yards of it! Then around 2009/10 I purchased a book with the basis of this quilt in it.  The setting blocks in the original quilt were embroidered, and the border with the diamonds was different. I made it my own because I liked the basic layout. I had lots of fun making it and I finished it in October of 2018. It had a place of honor on our bed during the Christmas holiday. I am very pleased with this quilt.


I had no idea it would be so long that I would be able to pull it over the pillows! Happy Discovery!


This sweet little quilt was not supposed to turn out this way. I planned to make the four patches all line up in the same direction.  However while adding the white squares between them I didn't pay attention until I had about half of them sewn on that some were going the other way.  Well at first I thought I would have to unsew the pieces. Then I realized that I could arrange them this way and they were totally fun that way.  I was really just playing with fabric at this point with really no goal in mind.  About that time a baby shower invitation came for a young woman at my church who was having a boy.  So I put blue fabric on the back and voila a baby quilt! Such happy colors for the little guy. And I may do another quilt with this setting because it was so fun.


So back to the drawing board to make a quilt with four patches all lined up in the same direction and alternating with scrappy background fabrics instead of one fabric. Love it! Easy quilt, uses up lots of different pieces. And wouldn't you know it, another baby has arrived and needs a quilt! Yay! This one is a baby girl. To add even more fun to the quilt I put a colorful back on it.

Lots of fun!

Now you might notice that these two quilts are "scrappy". Here is where a story of my journey as a quilter comes in.  In a my very first blog post, August 2012,  I shared my first quilt, a scrappy square quilt that my grandmother helped me make.  I made a quilt with precut squares that were sold in a kit, and I made a quilt with preprinted pillow panels. Then I began "serious" quilt making by making my first ever quilt cut with a rotary cutter and a template. A fall leaf quilt with lovely fall colors.  Up to this point the quilt colors had all been determined by someone else. Not my own choosing.  Then I made my first ever strip pieced quilt where I chose my own fabrics. I used a blue and white check fabric with a muslin background.  This fabric said a lot about the quilts I was drawn to. One color and a background. I favor calm serene quilts. Not a lot of chaos or color.  My mother on the other hand was in love with what is commonly called "scrap quilts".  Quilts with lots of color and a large variety of fabrics.  I personally did not find these appealing.  Well my friends let me tell you that has changed! In the more than 20 years that I have been quilting I have truly learned to appreciate and embrace the use of lots of fabrics in one quilt. My mother isn't here to see this change in me, but I think she'd be pleased.  In the days ahead you will see many more quilts of this style. 

I hope you enjoyed todays blog post and look forward to reading more about my adventures in quilting.  I have lots more quilts to share that I was blessed to do in 2018, so check back later!